Conditional content lets you personalise marketing and operational emails, so each recipient sees information that’s relevant to them. Instead of sending the same messaging to everyone, you can change parts of the email based on factors like behaviour, preferences, or previous booking details. For example, if you have some holidays leaving from specific airports, why not target those trips to people living within those areas? This can be set up as Conditional content in your AdHoc and Recurring emails.You can in additional use Conditional Layout in Recurring emails.
This makes your communication feel more tailored, improves the customer experience and increases engagement because people are more likely to act on content that applies to them.
It also helps your team work more efficiently. Rather than creating separate templates for every segment or use case, you can build one email that automatically adapts to different audiences.
Here is a basic breakdown of how to set up your audience criteria and then your Emailer using Conditional Content. If you would like to go through it with a member of our team, please let us know and we'll arrange some training.
Part 1: Selections/Campaign Setup
Before setting up your email in Emailer, you need to create your audience selection for the campaign. Go to Selections then choose either your new Campaign criteria, or find the previously set up Campaign you'd like to use.
1. Create Your Campaign
Create a new campaign, or
Search and filter to find an existing template, or
If this is a repeat campaign, find the previous email and note the Email ID
2. Copy Existing Page Criteria
If you’re basing the campaign on an older one, copy and save the page criteria for reference.
3. Update the Criteria
Adjust the audience filters as required for the new send - if you are including Conditional content, please ensure you include your criteria data that you need, so for example, Holiday Type data if you want to target different groups with different offers.
4. Check Suppressions
Ensure any required suppression group is applied.
5. When creating or copying existing Criteria, make sure the data you want the conditional content to work off is tagged in the output formatter
5. Save Your Work
6. Update Campaign Details
Update name,
Release date,
Manager.
7. Modify Seeds
Select “Modify Seeds”.
Confirm the correct seed list is attached - to create a Seed list or add emails to one, see this document
8. Confirm Changes
Click OK.
9. Save and Note Campaign Number
This number will be needed in the Emailer tool.
Part 2: Building the Email (Emailer Tool)
10. Create Email
Choose Recurring → Select Create New if creating a automated email with Conditional Layout, or AdHoc for a one-off email such as a newsletter that requires Conditional Content.
Create your email design as required in Design Email
11. Upgrade the Campaign
Use the campaign number you saved in Step 9.
12. For Repeat Campaigns
Go to Design/Preview
Load the previous HTML
Locate and save the Email ID as noted in Step 1.
13. Add Conditional Content (If Required, see Creating Conditional Content below for more on this)
Once Conditional content has been added, complete the following steps:
14. Send Test Emails
Send tests to yourself.
Check:
Layout
Link
Dynamic content visibility
15. Final Approval
Once approved:
Sign off
Schedule send date/time
Activate the campaign
Part 3: Creating Conditional Content
16. Identify What Content Will Be Conditional
Decide which elements change by segment (country, product, offer)
17. Generate Conditional Content Spreadsheet to create Rule
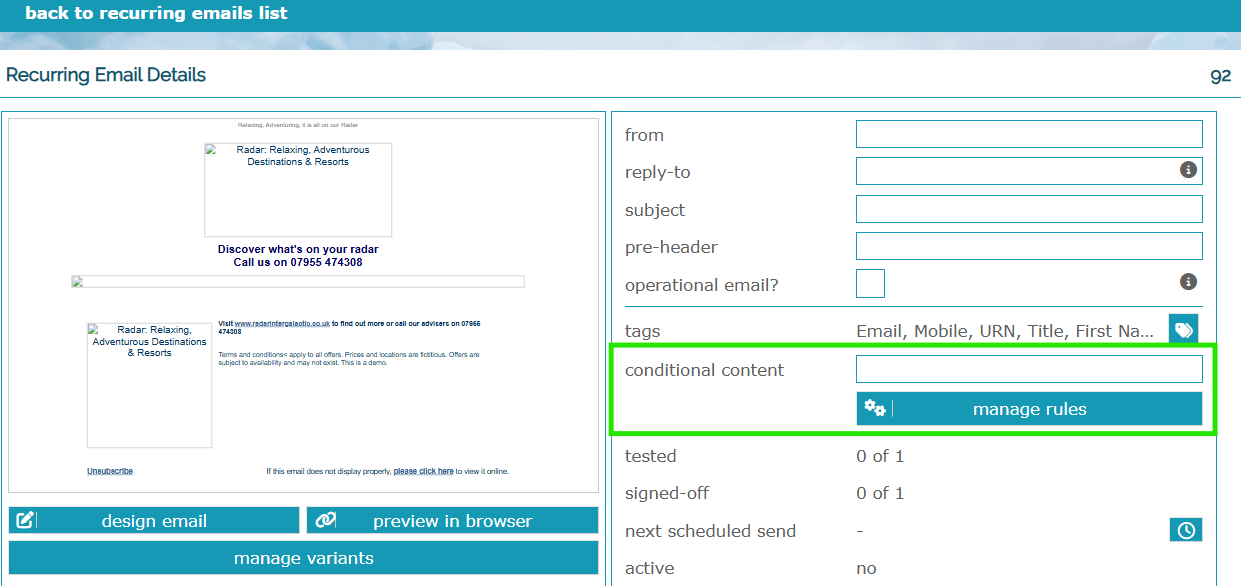
From the emailer design details:
Click Manage Rules
Select “…or create a new one”
18. Name Your Rule & Download Blank Spreadsheet
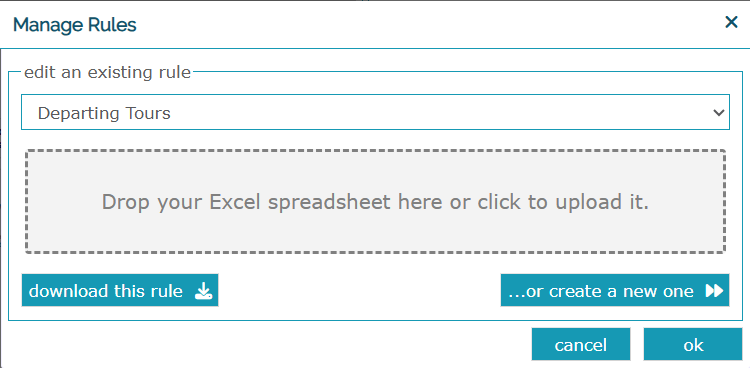
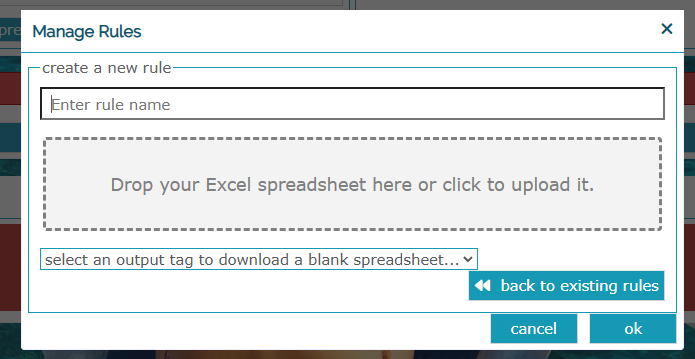
Choose a descriptive rule name
Select the output tag (ensure the correct tag is added to your output format)
Download the blank spreadsheet (this will automatically download once ready)
19. Add New Fields (If Needed)
Insert new columns near the start of the sheet. Examples:
Offers → image URLs
Feature link → hero and other key hyperlinks
From price → promotional pricing (e.g 123)
Please Note: Dragging the spreadsheet into the first one (edit existing rule) will over write the data in the rule selected by the dropdown, while dragging it into the second one will create a new rule. Updating an existing rule when the structure of the spreadsheet has been changed (e.g. columns added or removed) may cause errors due to old data not being purged from the dataset.
20. Upload the Completed File
Drag the spreadsheet into the upload area. Do not navigate away — wait until it finishes!
21. Confirm Upload
When the previous spreadsheet name reappears, click OK.
22. Apply the Conditional Content
In the email designer:
Open the Conditional Content panel
Select the newly uploaded rule
23. Use Tags in the Email
The tags from your spreadsheet will now be available in the conditional content dropdown.
Editing Conditional Content
24–25. Update Your Spreadsheet
Make necessary edits and save.
26–28. Re-upload
Go to Manage Rules
Select your campaign
Drag in the updated file
Wait for it to finish uploading
Conditional Content in Subject Lines
29. Open Design Preview
Open the email in Design/Preview mode.
30. Load Previous HTML (If Repeat)
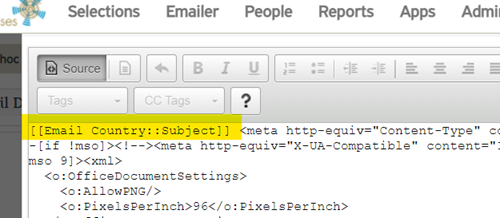
31–32. Add Subject Line Placeholder
Go to Source and insert the following (with a space after):
33. Save
34. Add Placeholder Subject
Type anything into the subject line (it will not be used).

35–36. Load Subject Line Spreadsheet
Ensure each segment/country has its correct subject line in the Subject column.
37. For Testing
Append Trade/Consumer/Country to the subject lines to identify which version is rendering.
38. Before Final Send
Remove the extra testing identifiers.
Conditional Layout – How-To Guide
Instructions highlighted in blue
Code examples highlighted yellow
The Conditional layout flag must contain the words TRUE or FALSE.
Then start the layout with the yellow highlighted section
<!--[?(![[Balance Due Flag::BalanceDueCCFlag]])?]--><br />
If you have paid your balance within the last two days, we may still be processing this payment. If you have paid your balance earlier than this, please contact us to ensure your payment has been received. <br />
<br />
And End it with this yellow highlighted section
<!--[??]-->
Was this article helpful?
That’s Great!
Thank you for your feedback
Sorry! We couldn't be helpful
Thank you for your feedback
Feedback sent
We appreciate your effort and will try to fix the article